Hello!

Welcome to American Homestead. I'm happy you have found my blog. Make yourself comfy and see what's been happening around here. I write about the things that interest me ~ creativity, travel, food, nature and a happy life. I'd love to read your comments.

Monday, April 30, 2012

Building the Empire

Booth Trial


I leave for International Quilt Market
in just about 2 weeks so I decided to do
a test set-up of my booth in my gazebo.


Some of my stuff is on it's way back from
the big quilt happening in Paducah last week.
But I think it's all going to fit.  Of course there
will be drapes and lots more patterns but it
looked like rain, so this is just a quickie set-up.


These are just a few quick peeks for those
of you who won't be going to Market.
For those of you who will~ I'll be in
Booth 739 ~ stop by and say hello!


Sunday, April 29, 2012

Redbud 2012 Block of the Month ~ April

Flying in Circles


This is the April Block of the Month
for the Redbud Quilt Guild.  Each month
I will show how I made my block.

This makes a 12 1/2" unfinished block.


Fabric Requirements:

Fabric A: Tone on tone white or beige
2 - 4 1/4" squares - Mark
a diagonal line on back.
32 - 2" squares - Mark a
diagonal line on back.

Fabric B: Blue swirl print with green
1 - 6 1/2" square
2 - 4 1/2" squares

Fabric C: Dark green
8 - 3 1/2" x 2" rectangles

Fabric D: Medium gold
8 - 3 1/2" x 2" rectangles


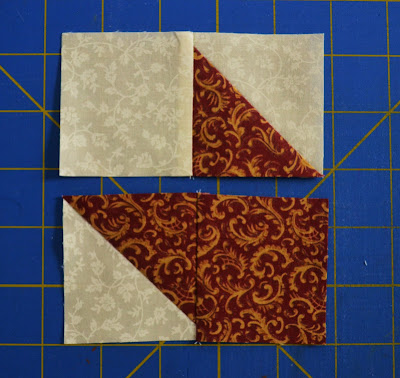
Make Half Square Triangles:
Pair Fabric A and Fabric B 3 1/4"
squares with right sides together.
Sew 1/4" away from each side of
drawn line, cut on drawn line and
press to the darker fabric.  Square
to 3 1/2". 


Make Flying Geese Units:
Place 2" Fabric A square on left
side of 3 1/2" x 2" rectangle and
sew a thread width above drawn
line.  Press seam to the corner
and trim back 2 layers of fabric.
Repeat to other side of rectangle.
Square to 3 1/2" x 2".
Use all Fabric C and Fabric D rectangles.


Make Outer Center Units:
Layout units as shown and sew together
taking care to keep points precise.  Press
outer seams to the inside and center seam
open to reduce bulk.
Square to 3 1/2" x 6 1/2".
Make 4.


Layout units as shown and sew
 together in 3 rows.  Press seams in
rows 1 & 3 to the outside and seams
in row 2 to the inside.


Sew rows together and press final
seams open to reduce bulk.
Square to 12 1/2".


Friday, April 27, 2012

I Walk Around the World Taking Pictures


and that's awfully tough on shoes.

The second pair of Borns I have
ruined in the past year...

Thursday, April 26, 2012

Happy Birthday

Frederick Law Olmsted


Today is the 190th birthday of one of
the designers of one of my favorite
places in the world.


Central Park!


Whether you are taking an
Amble through the Ramble...


or strolling through Scholar's Walk...


or enjoying Bethesda Terrace...


or climbing up to Belvidere Castle.

Just be sure to go and enjoy this
breathtakingly beautiful place.


Wednesday, April 25, 2012

Chock-A-Block Wednesday

Laurel Wreath


This is a block from the 1930's
that is also known as North Carolina.


Fabric Requirements:

Fabric A: White
4 - 2 1/2" squares
12 - 3 1/4" squares - Mark
a diagonal line on back.

Fabric B: Red
4 - 2 1/2" squares
1 - 4 1/2" square
4 - 3 1/4" squares

Fabric C: Green
8 - 3 1/4" squares


Make Half Square Triangles:

Pair 3 1/4" squares with right sides
together in the following combinations:

4 - A/B     8 - A/C

Sew 1/4" away from each side of drawn
line, cut on drawn line and press as follows:

A/B - press to the Fabric B
A/C - press half to the Fabric A
and half to the Fabric C


Make Corner Units:
Layout units as shown and sew together
in 2 rows.  Press seam in row 1 to the left
and seam in row 2 to the right.


Sew rows together and press seam to
the top.  Square to 4 1/2".
Make 4.


Make Outer Center Units:

Layout units as shown, paying attention
to the arrows showing which way the
seams have been pressed.  "Lock" the seams
together before pressing, this will make
your points very precise.  Sew together in
2 rows.  Press seam in row 1 to the left and
seam in row 2 to the right.


Sew rows together and press seam to
the bottom.  Square to 4 1/2".
Make 4.


Layout units as shown and sew together
in 3 rows.  Press seams in rows 1 & 3 to
the outside and seams in row 2 to the inside.


Sew rows together and press final
seams open to reduce bulk.
Square to 12 1/2".


Tuesday, April 24, 2012

What is the Craziest Thing You've Ever Done?


My daughter Kate attends Purdue University
and each week she has dinner with a faculty fellow
and other students.  This week the faculty fellow's
question of the week was,  "What is the craziest
thing  you have ever done?"  Kate won.
Her answer?  Steering a bamboo raft down a river
in a monsoon.  And I was along for this ride.


We were in the jungles of northern Thailand, we
had just spent the morning riding elephants and
had a lovely lunch when we went to ride a raft down
the river to meet up with our driver.  As Murphy's
Law would have it, as soon as we got on the raft
the monsoon hit.  There were 7 of us on this little
bamboo raft, in torrential rain.  They gave us these
goofy yellow party hats to keep the rain off us and
everytime we looked at each other we burst out
laughing.  And the ride went on forever...


Pure unadulterated joy!
I hope to experience many more crazy
adventures with you Kate!


Monday, April 23, 2012

Mrs. P. Pierce

Who Are You?


Okay, I admit it, I have a problem with
thing for silver.


I'm always on the quest for another
interesting piece for my collection.


I have LOTS of silver polish because when
I travel and find something new, I have to
polish it up to see the treasure beneath.
Someday, I'll wise up and bring along some
polish in a little travel bottle.


Does it bother me if someone else's
monogram is on it?  No, not at all.
That just makes it more interesting.


I never buy things at some chi-chi antique
store ~ that's no fun!  I want to rummage
through old boxes and bins at a flea market
or thrift store or garage sale.
It's all about the treasure hunt.


And that's how I found the Mrs. P. Pierce
spoons.  I was on my way to a quilt show
in Marion, IN, about a 1/2 hour from my
home and just as I was pulling into town
I spotted a huge sale at a church.  I had to
go!  Now I had $10 dollars in my pocket,
it was the cost of admission to the quilt
show.  I found a box filled with silverware.
It was the box that a case of soda would come
in,  when I asked the price they said it was
whatever I wanted to give.  I asked, "$10?"
So much for the quilt show....
But I've never regretted it.  I find this monogram
to be so strange, it is so specific.  Wouldn't it
be more common to just have a "P" or even 3
initials?  Did Mrs. P. Pierce have many sets of
silver and she needed something different on
this set?  I guess it's a question I'll just have to
ponder.  But in my house, you are an honored
guest when you get the Mrs. P. Pierce spoons.
My Mum always gets one with her tea.
And whenever I eat ice cream, I use one of
these to eat it, it just makes it taste better
somehow. 


Sunday, April 22, 2012

Sunday in the Park with Ahmet


It was Easter Sunday in a country with no
jelly beans or Easter bunnies.  We planned
to go to church but couldn't find it.  We
probably should have taken the Bosphorous
cruise since it was such a beautiful day but
my never-ending quest for old stuff came first.

I had heard there was a great Sunday market at Ortakoy.
I had to go.  I was imagining old keys, some old
Turkish plates, maybe a few pieces of silver.

We were told to take the bus to Ortakoy and
we made it to the bus station which is really
just a ticket booth and outdoor lanes where
the buses pull in to load.  We were lost.
We couldn't find our bus and that is when we
met Ahmet.  He is a young lawyer, visiting Istanbul
for the day and he could speak English ~ yeah!


Ahmet walked around with us trying to find
the right bus, asking this person and that.
We would never have found this ourselves.
Finally we found the right bus and Ahmet
came along with us.

Unfortunately, the market at Ortakoy was
a bit sleepier than I had anticipated.  It was
mainly the scarves and jewelry and food
stalls that we had seen already.
No old stuff.

So we decided to head back to a park near
Topkapi Palace to see the tulips.  On the way
we talked and talked, comparing our countries
and our lives, Ahmet taught Ellen how to cross
the street in traffic ~ I'll never get used to that!


We spent the afternoon in Gulhane Park,
sharing drinks and big circles of bread
covered in sesame seeds.  We watched the
world go by on this lovely Sunday.


The afternoon somehow turned into an English
language lesson.  Ahmet & I both happened to
be reading The Picture of Dorian Gray, so we went
through the book and we tried to explain the meaning
of words or phrases Ahmet did not know.  I would
pronounce words and he would record me on his
phone.  I even sang a song!
What fun we had ~ we only left because we had a
planned phone call with our family back home
since it was Easter.

And Ahmet ~ here is a video of the song I
sang, sung by people with better voices...


Saturday, April 21, 2012

Quilt Class: How to Make a Hanging Sleeve


If you make a quilt for a wall or for a bed
you may need a hanging sleeve.  For a wall
hanging you need it for obvious reasons but
if you plan to enter your bed quilts in a quilt
show or exhibit you will need a hanging sleeve
so the quilt can be hung for the show.


First measure the area inside the binding
on the top back of your quilt, add 1 inch.
I like to use fabric that matches the backing
fabric of the quilt if possible, cut a strip of
fabric 9" x the measurement from above.
You may have to piece this strip if you have
a very large quilt.


On each 9" edge turn under 3/8" and press,
turn again and press and stitch along the edge
using a 1/4" seam foot.


Bring the two long edges together with
right sides together and stitch using a
1/4" seam.


Open up the tube as shown so the seam is
in the center and press open the long seam.
Press the edges gently.  Turn the tube out to
the right side and press along the edge lines.


Place the sleeve evenly between the 2 side
bindings and just below the top binding,
with the seam in back.  Pin in place.


Take a few small stitches on the back of the
quilt to hold the knot, then bring the needle up
through the very edge of the top of the sleeve
and put the needle down just on top of the
sleeve.  Do not put needle all the way through
quilt, you want to just skim below the backing
fabric and catch a bit of the batting in the stitch.
Bring the needle back up 1/4" away and repeat.


As I am stitching, I keep my fingers of
my left hand on the front of the quilt
to be sure the needle does not come
through to the front.  Continue stitching
all the way across the top and make a knot
at the end beneath the sleeve.


Now here is the magic part of this process.
If we were to just stitch the bottom part of
the sleeve as it is, it can make your quilt hang
strangely.  So, pull up the fabric on the bottom
and fold about 3/8" below the pressed edge.
Just be sure the sleeve does not go above the
edge of the quilt.  Press this new edge.


Then take a ruler or a yard stick and
get the top edge nice and even, then
press this edge.


Pin both long edges to keep the
sleeve even and in place.


Sew the bottom edge the same way
as the top but this time fold the top
under a bit so you can still use the
fingers of your left hand to make
sure the needle does not come through.


I also sew down the back sides of the
sleeves.  Remember you most likely
will not be hanging your own quilt at
a quilt show and if someone just slides
the rod in the space between the backing
and the sleeve then your quilt will not
 hang as nicely.  So take the few extra
 stitches to make it just right.


And you are done!

Now don't forget to add a
quilt label.