Hello!

Welcome to American Homestead. I'm happy you have found my blog. Make yourself comfy and see what's been happening around here. I write about the things that interest me ~ creativity, travel, food, nature and a happy life. I'd love to read your comments.

Sunday, July 31, 2011

Civil War Remembered ~ Block 31

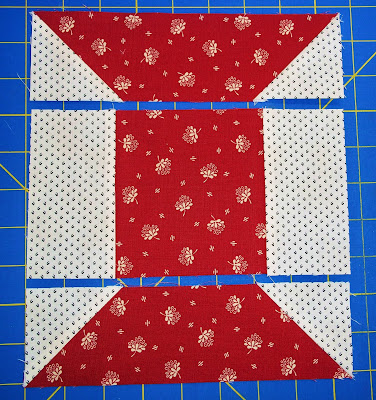
Empty Spools


We are quilting along with Barbara
Brackman's Civil War Quilt.


Fabric Requirements:

Fabric A: Dark (Red)
2 - 2 1/2" x 8 1/2" rectangles
1 - 4 1/2" square

Fabric B: Light (White print)
4 - 2 1/2" squares - Mark
a diagonal line on the back.
2 - 2 1/2" x  4 1/2" rectangles


Layout 4 1/2" square and 2 1/2" x 4 1/2"
rectangles as shown and sew together.


Place 2 1/2" squares right sides together
with 2 1/2" x 8 1/2" rectangles as shown.
Sew on drawn line and press to the corners.


Trim back 2 layers of fabric to 1/4".


Layout units as shown and sew together,
  press seams open to reduce bulk. 


Square to 8 1/2".

Check out everyone's blocks
 on Dustin's Flickr site:


And a full spool.


It would make a pretty quilt.


I like it even better with sashing.


Saturday, July 30, 2011

Building the Empire ~ A New Pattern

Stars Over The Homestead


I planned to finish this pattern
before our trip but with everything
that was going on, that didn't happen.

I thought I could work on it while on
the trip, but with everthing that was
going on, that didn't happen.

Then I heard from a shop that wants
to teach it as a year long class, that
was just what I needed to wake me
from my " I just went around the world,
now what? stupor."  I got to work and
in 3 days finished a detailed 15 page
pattern.  Oh how good it feels to finally
get it done!  It will head to the printer
this week.

Now on the the list of 6 other
 deadlines I must tackle this week...


Friday, July 29, 2011

Friday Quilt Class: Preparing Quilt Fabric

To Wash or Not To Wash


If I were to tell you I ALWAYS prewash
my quilting fabrics, I would be lying.
Often I'm at a class or at Me Time and
I purchase fabric and use it right away.
Even if I bring fabric home, sometimes
I can't wait to dive right into a project.

But I'm not saying I'm right.


In a perfect world, I would prewash
all quilting fabrics that came into
my studio.  Yet none of us are perfect...

So here are a few things to consider
and you can decide for yourself.

Fabrics can release (or bleed) their
dyes, it happens with our clothing
and it can happen with our fabrics.

Fabrics shrink.  If you make a quilt
and then wash it, it may pucker due
to shrinkage.  Some people do this on
purpose because they like the antique
look it gives, which is fine if that is what
you are going for.  But if you are not, you
won't be happy.

Different fabrics shrink differently.  So if
you have 5 fabrics in a quilt and they all
shrink differently, you could end up with
a mess.

Fabrics have a variety of chemicals on them,
from starches to sizing to bug repellants.  I
don't want to snuggle with a chemical laden
quilt.  Also if you are allergic to such things,
it would be better to get rid of them.


When I do wash fabric I make a
diagonal cut on all 4 corners.  This
helps prevent thread loss and knotting
in the washer and dryer.  This also
indicates the fabric has been washed.


When I wash, I always put fabric in
the dryer so the heat will shrink the
fabric.  When I take the fabric out of
the dryer I hang it on a line in my
laundry room until I can get around
to ironing it.


Nowadays ironing fabric is a breeze.
A few years ago we were driving down
a street when I called out, "Stop!"
There on the side of the road was a treadle
machine base, I had the guys put in the
trunk and I made myself this great
ironing table, so much easier than an
ironing board.


This is a quilt I designed recently.
There were many batiks in this
piece and I wanted to do a test
patch before I committed to buying
all that fabric.  I made up a block
(without prewashing) and as I was
pressing the finished block I added
some steam and the blue ran into
the white.  What a lesson I learned.
I washed every piece of fabric for
this quilt before making it.


The fabrics, batting and quilting
cost over $500 for this quilt but
more importantly I worked on it
everyday for a month and would
have been devastated if it were
ruined.


Thursday, July 28, 2011

Mick's Mexican Layered Tostada

Muy Delicioso!


This is a recipe from my brother
who is a great cook.


Ingredients:

For the meat/bean mixture:
1 - 50 oz. can black beans, rinsed and drained
1 pound ground beef - cooked and drained
2 packs reduced sodium taco seasoning
1 1/3 cups water

For the salsa:
1 medium red onion
2 avocados
3 plum tomatoes
a handful of cilantro
lime juice
salt and pepper

To assemble:
tostadas, heated
sour cream
chopped scallions
shredded sharp cheddar


To make the meat/bean mixture
combine ground beef, beans, taco
seasoning mix and water in a large
pot.  Bring to a boil and then reduce
heat to a low simmer.  If I am going to
be home, I will prepare this mid afternoon
so the flavors will intensify with simmering.
If you don't have much time it will still
taste great.  Stir occassionally and if it looks
like it is drying out add a bit more water.


To make the salsa, dice tomatoes,
avocado and red onion in a medium
sized dice to make a chunky salsa. 
Add chopped cilantro, the juice of a
 fresh lime and salt and pepper to taste.


To Assemble:
In a bowl layer meat/bean mixture,
shredded cheese, tostada, meat/bean mixture,
shredded cheese, tostada, salsa, sour cream
and chopped scallions.

Ole!


Wednesday, July 27, 2011

Chock-A-Block Wednesday

Churn Dash


We are starting a new feature
this week at American Homestead.
Each week we will give a tutorial
on a quilt block.  You can view it
here but also use our new blog:
as a resource for quilt block
ideas and instruction.  We
hope you enjoy it!


Fabric Requirements:

Fabric A: Medium (Green)
2 - 5 1/4" squares - Mark a diagonal
line on back.
4 - 2 1/2" x 4 1/2" rectangles

Fabric B: Dark (Blue)
2 - 5 1/4" squares
4 - 2 1/2" x 4 1/2" rectangles

Fabric C: Light (Yellow)
1 - 4 1/2" square


Make Half Square Triangles:
Pair Fabric A and Fabric B 5 1/4"
squares, right sides together.  Sew
1/4" away from both sides of drawn
line.  Cut on drawn line and press
to the darker fabric.


Square to 4 1/2".


Make Center Outer Units:
Pair Fabric A and Fabric B
2 1/2" x 4 1/2" rectangles, right
sides together and sew together
along one long edge.  Press to
the darker fabric and square
to 4 1/2".


Layout units as shown and
sew together in 3 rows.  Press
seams in rows 1 & 3 to the outside
and seam in row 2 to the inside.


Square to 12 1/2".  Press
final seams open to reduce bulk.

The Churn Dash block is a traditional
block from the early to mid 1800's.
This block has also been called:
Hole in the Barn Door, Ludlow's
Favorite, Broken Plate, Old Mill Design,
Picture Frame, Puss in the Corner,
Dragon's Head and Monkey Wrench.


Tuesday, July 26, 2011

Me Time ~ July 26

How can it be the end of July already?


The summer is flying by!


Someone's future project
for Christmas.


Christmas is only 5 months
away, better get to work!


Someone else is working on
ornaments for a Guild tree.


We celebrated another
July birthday.


Alterations were being done.


I'm finishing the binding
on my Fall All Stars.

Monday, July 25, 2011

Angkor Wat

A Long Journey to a Desired Destination


A long journey is definitely an
understatement.  We were halfway
around the world and exhausted.
Our day started before dawn in
Kuala Lumpur, get ready, bags 
downstairs to meet the driver, 
speeding along an empty highway
through endless palm fields to
an airport that was bustling with
people when the world should 
still be asleep.  No one was on the 
road coming in, where did all these
people come from?  Did they sleep 
here?  Grab a donut and some juice,
wheels up with the sun and we 
were off to Cambodia.


The airport in Cambodia looks
like a tropical resort hotel.  The
plane dropped us off outside the
door like we were getting out of a
taxi.  You then enter a room that
has a large curved desk filled with
officials in uniforms with more
epaulettes and braids than a high school
marching band.  You then pay $20 US
per person to get a visa and wait for
your name to be called.  It is so
official looking at first it feels a
bit frightening, they look like
Cambodia's Supreme Court, you think
will they let me in?  When I was called
up to the desk I was asked if I had 2
children, I said yes, and then was asked,
only 2?  I guess that isn't enough
in Cambodia.


We met our driver and headed to
our hotel oasis right in the middle
of Siem Reap.


As always, in Cambodia and Thailand,
we were greeted with cool drinks
when we arrived.


We explored town a bit and
had some lunch.


Then it was time for a nap
while the water feature trickled
into the lotus filled pond.


A refreshing swim in the rooftop
pool and we were ready to explore.


I knew the temples were in the jungle
so I assumed it would be quite a ride
to get to them but after only 10 minutes
we were buying our passes.  Angkor Wat
is only 5 1/2 km from Siem Reap.


This is a man made moat that
surrounds the temple complex.
It is 1.5 km x 1.3 km, created by
hand, it represents the oceans
surrounding the earth.


Angkor Wat was built in the
12th century.  It was first used
as a Hindu shrine, then Buddhist.
It was a pilgrimage destination,
abondoned in 1432 and forgotten
for a few centuries.


On the approach to the main temple
you pass a library building.


As I was walking up to the main
temple I noticed a flash of the saffron
robes of a monk running along the
arcade with his arms outstretched.  An
expression of sheer joy, I understood,
I was happy to have made it here as well.


Angkor Wat is the world's largest
religious monument.  The size of the
complex can't be described in words or
captured in photos.  You must see it in
person to understand the immensity of
it.  How could this be built in a remote
jungle in the 12th century with hand
tools and elephants?


There are endless bas relief
friezes.  How many skilled artists
were there in a remote jungle in
the 12th century to carve all of this?


This is not a destination for someone
who is not in good physical shape. 
It is a bit overwhelming, the heat,
the physical exertion in the heat,
all the stairs and walking exhausts you.
There are lots of crumbling, steep
staircases to climb and then,
you must get down them as well.


There are endless high
thresholds to climb over.


Every once in a while you'll see
some color in a carving.  How long
ago was that paint put there?


You can't miss the flash of color
of the monk's robes against the
sandstone of the temples.


This young monk was playing
with some of the visiting children.
Kids are the same all over the world.


I'm always drawn to trees in art.


Exiting the main temple looking
back toward the main gate.


On our way out, we stopped at one
of the library buildings and sat out
on the ledge with our feet dangling
over the side, looking back at the main
 temple as day began to fade to night.


Exhausted, we followed the
monks out of the complex.


And waiting for us was our wonderful
driver, Hoeum.  If you are ever in need
of a driver in Siem Reap I would highly
recommend him.  As you can see from
the photos the temples are very dusty
and we would track dust into his van
at each stop but while we were touring
he would clean up so it was perfect when
we got back.  He would have moist towelettes
that he kept on ice so we could cool
down and wipe the dust from our
faces and hands.  Then he had iced water
for us to keep us hydrated.  He always
arrived an hour before our scheduled
departure in the morning and when we
asked him about it he told us if he was
late it would be his fault, very conscientous.
We said a sad goodbye to Hoeum at the
border at Poipet, he took good care of
us to the very end of our journey with
us.  He can be reached at country code
855 o12 799415.