Hello!

Welcome to American Homestead. I'm happy you have found my blog. Make yourself comfy and see what's been happening around here. I write about the things that interest me ~ creativity, travel, food, nature and a happy life. I'd love to read your comments.
Showing posts with label quilting tutorials. Show all posts

Sunday, February 23, 2014

Threads of Memory ~ February

Mercer County Star


We are quilting along with Barbara Brackman's
Block of the Month, Threads of Memory.

http://civilwarquilts.blogspot.com

This is how I made my block, it may
differ from the original.


Fabric Requirements:

Fabric A: Red print
4 - 4 1/2''squares

Fabric B: Green
1 - 6'' square 

Fabric C: Large Light Print
2 - 6'' squares - Mark a 
diagonal line on back.

Fabric D: Blue
1 - 6'' square

Fabric E: Small Light Print
4 - 1 1/2'' squares
4 - 1 1/2'' x 2 1/2'' rectangles

Fabric F: Red
8 - 1 1/2'' squares - Mark a 
diagonal line on back.

Fabric G: Fussy Cut
1 - 2 1/2'' square

Make Small Center Star: 


Make Flying Geese Units:

Place a Fabric F 1 1/2'' square on left
side of a Fabric E rectangles and sew
a thread width below drawn line.  Open
and press to the corner, trim back 2 
layers of fabric to 1/4''.


Repeat process on the right side of 
rectangle.  Make 4 of this unit.


Layout units as shown and sew
together in 3 rows.  Press seams 
in rows 1 and 3 to the outside and
seams in row 2 to the inside.


Sew rows together and square to 4 1/2''.


Make Quarter Square Triangles
(Outer Center Units)

Pair 6'' squares in the following combinations
with right sides together:
1 - B/C    1 - C/D
Sew 1/4'' away from each side of drawn line,
cut on drawn line and press seams to the
Fabrics B and D.  On the Fabric B/C units,
mark a diagonal line on the opposite
diagonal from the seam.


Pair a B/C unit with a C/D unit with
right sides together as shown.  Be 
sure to have seams lock against each 
other.  Sew 1/4'' away from each side 
of drawn line, cut on drawn line and
press seam open to reduce bulk.


Squaring a Quarter Square Triangle is easy 
if you follow the directions!  Place the diagonal
line of the ruler along the seam line as shown.
Since we want a 4 1/2'' square, place the 2 1/4''
intersection at the center of block (as shown
with the arrow), now trim the top and right 
seams.  


Rotate the unit and place the 4 1/2''
lines of the ruler along the left and bottom
edges and trim the remaining untrimmed
edges.  Make 4 of this unit.


Layout units as shown and sew together
in 3 rows.  Press seams in rows 1 and 3
to the outside and seams in row 2 to the 
inside.


Sew rows together and press final seams
open to reduce bulk.  Square to 12 1/2''.

Check out everyone's work on Dustin's Flickr site:
http://www.flickr.com/groups/threadsofmemory/#

If you like what you see here, please
become a follower of this blog and leave a 
comment, let me know you are out there!
~ Ellen


Wednesday, January 8, 2014

Dixie Diary ~ First 2014 Finish!


I have been participating in Barbara Brackman's
Block of the Month, Dixie Diary.  We
did a block a month throughout 2013.  Some months
I got the blocks done promptly and some months it
just didn't happen.  Prepping for Quilt Market and
working on my first book took a lot of my time this
year,  But by December, I was all caught up and I 
designed and pieced the top.

I was so excited to finish the quilt before the end
of the year and with weeks to spare.  In case you 
don't know, our name is Murphy and in typical
Murphy's Law fashion, just as I was free motion
quilting the final block in the quilt and dreaming 
about what movies I would watch while binding
it and what snacks I would reward myself with
for being such a good Block of the Month
 participant ~ poof ~ Crazy Janie, my sewing
machine said Nooooo, I'm done!  She locked up 
completely, the wheel refused to move.  I took
her to the hospital.  My daughter was coming
home from Purdue about this time and I told
her to bring home her Project Runway machine
from the sorority house, thinking I could free
motion quilt with that.  Ahhh, no.  Also no to
quilting on the featherweights ~ let's just say
I spent alot of time with a seam ripper...

Meanwhile Crazy Janie, was still in the hospital.
She needed a part and with 2 major holidays
and wild weather all over the country, there 
were delays.  Mr. Wonderful & I braved the
ice and snow last Saturday and picked her up.
She now purrs like a kitten.

So today, I put aside making samples and 
spent the day finishing the quilting on the 
last block and adding binding and hand sewing
the binding and I'm done!!!!  

Now I'm looking forward to the next project
due to start later in January.


Monday, December 16, 2013

Dixie Diary ~ December

Turning Yankee
 
 
We are quilting along with Barbara Brackman's
Block of the Month, Dixie Diary.
 
 
Here is my December block and it was finished
in December ~ yeah!!!!  Well, that winds up the
blocks for this year.  No tutorial this time since
I made it as described in the original post.
 
I was so excited to get the quilt pieced, quilted
and finished by Christmas.  While doing the
free-motion quilting on my home machine, I
got to the last block and poof! ~ my machine
just stopped.  MURPHY'S LAW!!!  The machine
is at the hospital and I await the diagnosis...
 
My daughter brought her Project Runway machine
home from the sorority house at Purdue (I love that
she took her sewing machine to college).  I'm going
 to see if I can quilt with it once it is unpacked from
the car.  Wish me luck!


Sunday, December 15, 2013

Dixie Diary ~ November

Just Hominy
 
 
We are quilting along with Barbara Brackman's
Block of the Month, Dixie Diary.
 
 
Still playing catch-up on the Dixie Diary
blocks.  No tutorial this time since I made
mine as described in the original.  My best
advice for this block is to go slowly and be
sure to mark 1/4'' from the edge when doing
the y-seams.  Good Luck!


Sunday, July 28, 2013

Honoring Women's Rights ~ Week 48

Fair Play

We are quilting along with Barbara Brackman's
Block of the Week, Grandmother's Choice.


This is how I made my block, it may differ
from the original.


Fabric Requirements:

Fabric A: Blue
2 - 4 1/2'' squares
Fabric B: Red
2 - 4 1/2'' squares
Fabric C & D:
scraps large enough for circle units
Wonder Under

Update:  Das Quiltmonster from Germany just
asked what is Wonder Under.  It is a paper backed
fusible web product.  Thanks Regina!

On the paper side of the Wonder Under
draw a 6'' square and then draw lines to
divide it in quarters.


Using a compass, draw a 6'' square,
then mark 1'' in from drawn circle
and draw another circle.


Layout 4 1/2'' squares as shown and sew
together in 2 rows.


Sew rows together and press final seam
open to reduce bulk.


Cut circle shapes as shown, leaving
some excess paper along curved parts.
Following manufacturer's directions,
adhere to the wrong side of Fabric C & D
scraps.  Cut out as shown above.


Adhere to 4-patch unit.


Finish edges as desired.  I used a
hand embroidered blanket stitch.
Square to 8 1/2''.

Check out everyone's work on Dustin's Flickr site:


American Homestead is
now on Facebook.  Please
"like" my page.


Saturday, July 20, 2013

Honoring Women's Rights ~ Week 47

Heroine's Choice
And A Feltwork Tutorial
 
 
We are following along with Barbara Brackman's
Block of the Week, Grandmother's Choice.


I like to use felt for applique.  I design
feltwork patterns ~
 
 
and thought this would be a good chance to try
a design that was 8 1/2''.
 
 
So here is a little free feltwork tutorial
for this week!
I start by determining the size I would
like the piece to be and marking that
measure along the fold of a folded piece
of construction paper.  I then sketch the
design and cut it out and when you open
the folded paper...
 
 
... you have your designs.  I used a circle
template for the 1 1/4'' circle and for the
flower shape, this pattern was just slightly
larger than a piece from my
 
 
Serendipity pattern so I made it larger.
 
 
It is a good idea to lay it all out prior
to cutting your pieces to be sure it all
fits well.
 
 
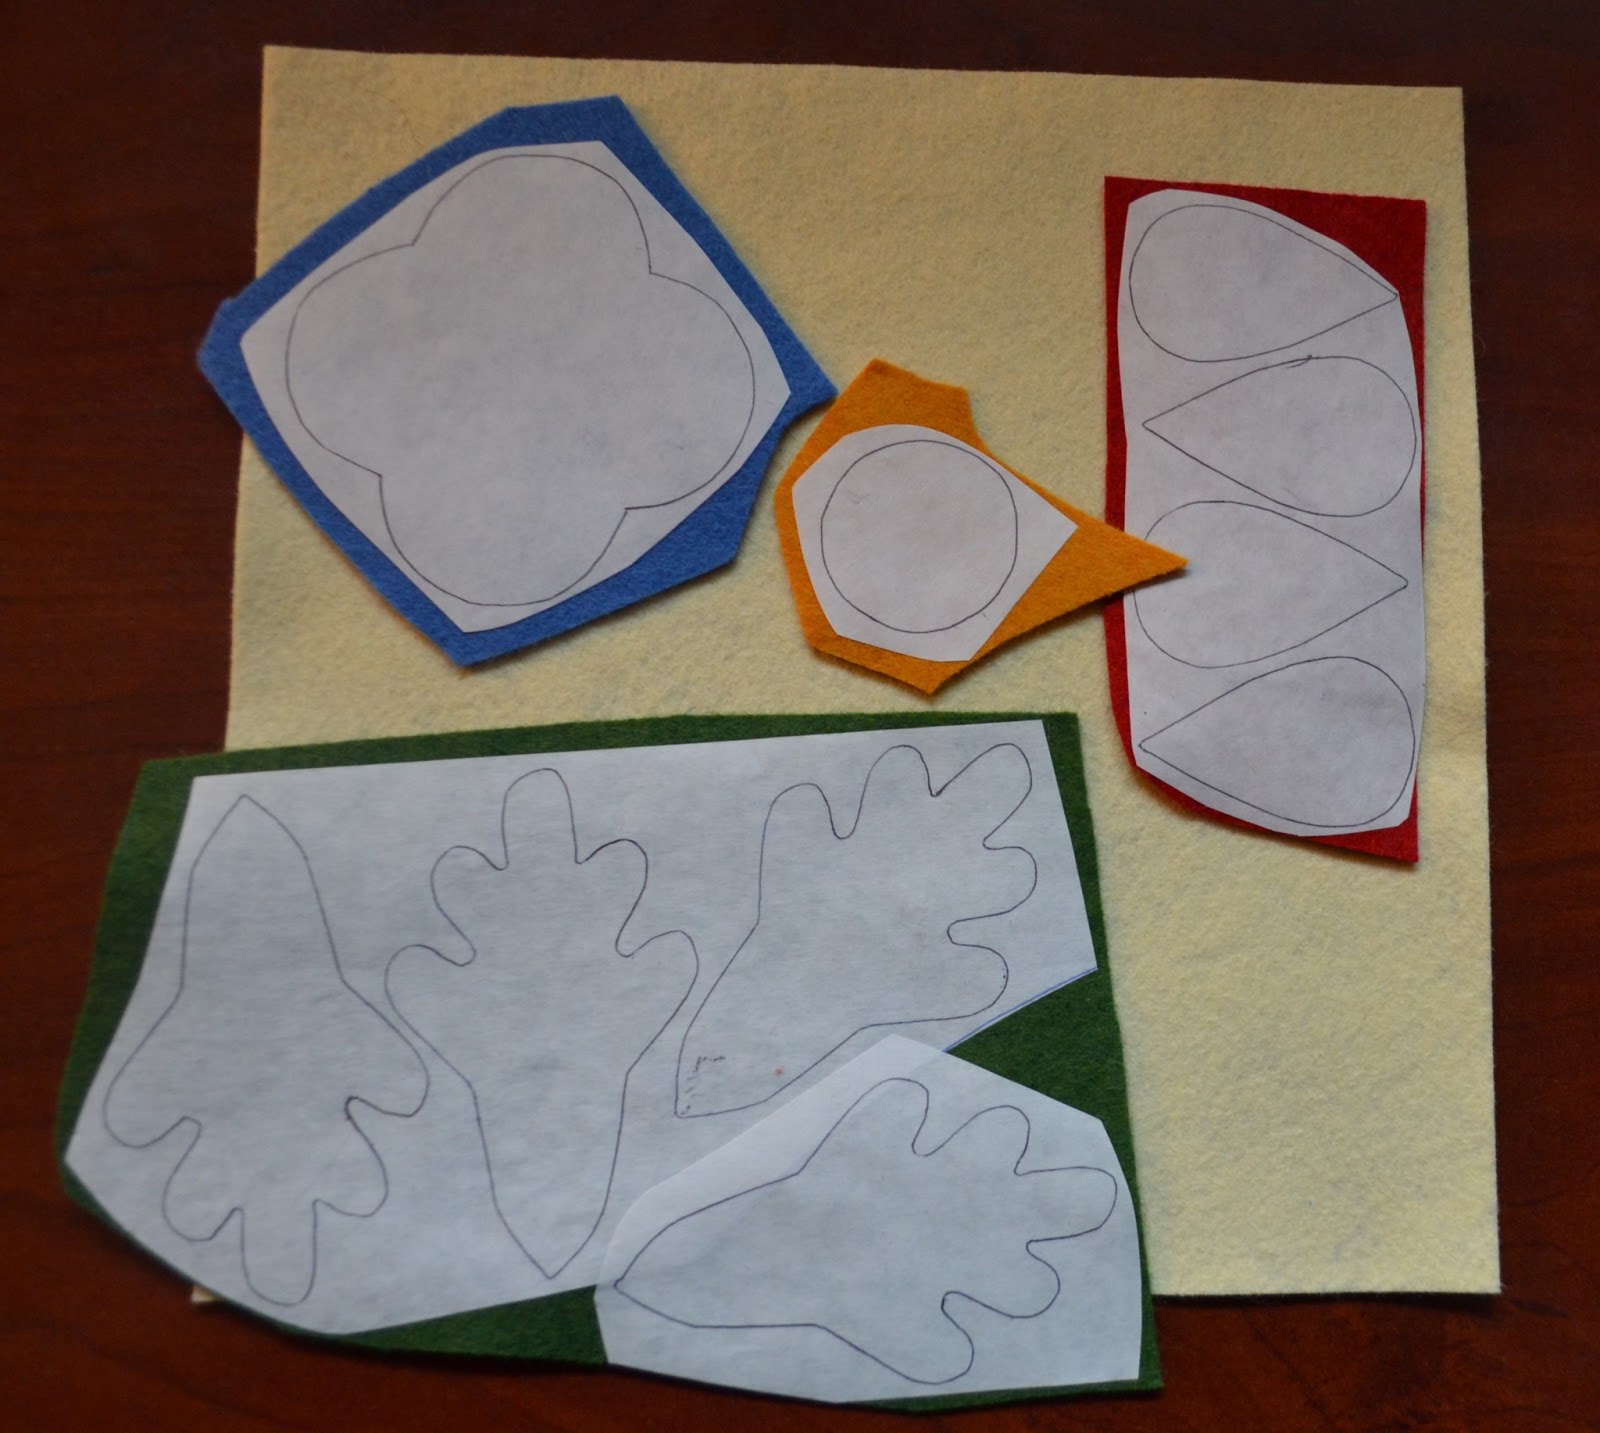
Here are my pattern pieces, just enlarge
the white area until it measures 8 1/2''
across.  At this point I transfer the designs
to poster board and cut them out since this
makes tracing more stable but if you are
only making one, you could trace the
construction paper shapes if you are careful.
 
 
Trace onto the dull side of freezer paper.
( If I have scraps left over from bigger
projects I save them and use them for
small pieces like this project.)
 
 
Press the shapes onto good quality felt.
I use a 20% wool/80% rayon felt from
National Nonwovens that is excellent
quality and the colors are fabulous.
This is nothing like the 5/$1 craft felt.
 
 
Cut out the pieces and pin to your 8 1/2''
background piece. 
 
 
I whip stitched all the pieces in place using
a matching embroidery floss.  I then added
some additional stitching to the center using
very simple embroidery stitches such as, the
French Knot and the Lazy Daisy stitch.
 
 
I'll be hanging this piece somewhere in
my house.  I hope you will give felt applique
a chance, it is fast, easy & fun.
 
Checkout everyone's work on Dustin's Flickr site:
 
American Homestead
is now on Facebook.
Please "like" my page!
 

Saturday, July 13, 2013

Honoring Women's Rights ~ Week 46

Barrister's Block

 
We are quilting along with Barbara Brackman's
Block of the Week, Grandmother's Choice.


This is how I made my block, it may
differ from the original.
 
 
Fabric Requirements:
 
Fabric A: White
1 - 2 1/2'' square
3 - 3 1/4'' squares - Mark
a diagonal line on the back.
 
Fabric B: Red
3 - 3 1/4'' squares
 
Fabric C: Floral
1 - 7 1/4'' square
 
Fabric D: Blue
1 - 7 1/4'' square - Mark
a diagonal line on back.
 
 
Make Small Half Square Triangles:
 
Pair Fabric A and Fabric B 3 1/4''
squares with right sides together.
Sew 1/4'' away from each side of
drawn line, cut on drawn line and
press seam to the Fabric B.  Square
to 2 1/2''.  You will have 6 Half
Square Triangles.
 
 
Make Large Half Square Triangles:
 
Pair the Fabric C and Fabric D 7 1/4''
squares and make half square triangles
as shown above.  Square these to 6 1/2''.
You will end up with 2 but only need 1,
keep the other for another project.
 
 
Make Side Unit:
Layout 3 Half Square Triangles as shown
and sew together.  Press seams to the bottom.
 
 
Layout side unit and large Half Square
Triangle as shown.  Sew together taking
care to sew a thread width to the right of
the intersections of the seams as shown
by the arrows.
 
 
By taking care in sewing the above seam,
your points will be perfect as shown above.
 
 
Make Top Unit:
Layout small Half Square Triangles
and the Fabric A 2 1/2'' square as shown
and sew together.  Press the 2 left seams
to the left and the far right seam to the right.
 
 
Place units together as shown and sew
together taking care again to sew a thread
width above the intersections of the seams
as shown by the arrows.   Press seam to the
top. 
 
 
Square to 8 1/2''.
 
Check out everyone's work on Dustin's Flickr site:
 
American Homestead is
now on Facebook, please
"like" my page!
 
American Homestead now has
a youtube channel with videos
of things we find interesting
from around the world.  More
to come, please subscribe.


Dixie Diary ~ July

Living Off Cornbread


We are quilting along with Barbara Brackman's
Block of the Month, Dixie Diary.


This is how I made my block.
It may differ from the original.
 
 
Fabric Requirements:
 
Fabric A: Blue & Cream Print
4 - 3 1/2'' squares
 
Fabric B: Red
8 - 3 1/2'' squares - Mark
a diagonal line on back.
 
Fabric C: White Print
4 - 3 1/2'' x 6 1/2'' rectangles
 
Fabric D: Dark Blue Paisley
1 - 6 1/2'' square
 
 
Make Flying Geese Units:
Place a Fabric B 3 1/2'' square on the
left side of a Fabric C rectangle as shown.
Sew a thread width above the drawn line.
Flip the square from the bottom corner to
the top corner and press. 
Note: Some people will teach you to trim
the seam first, please don't.  If you press
and then trim the back 2 layers of fabric
to 1/4'' you will have a much more precise
Flying Geese unit. 
So, trim the back 2 layers to 1/4''.
 
 
Repeat the above process to the right
side.  Square to 3 1/2'' x 4 1/2''.
Make 4 of this unit.
 
 
Lay out units as shown and sew together
in 3 rows.  Press seams in rows 1 & 3 to the
outside and seams in row 2 to the inside.
 
 
Sew rows together and press final
seams open to reduce bulk. 
Square to 12 1/2''.
 
 
I have added the border and applique
star to my block as described in the
instructions in January.
 

American Homestead is
now on Facebook.  Please
"like" my page!